
Introduction
There are several types of fish that are distributed with the Marine Biology Simulation case study. Many students will want to add their own fish to the simulation. This document describes that process. There are three steps in adding a new fish class to the case study.
- Create a new fish class to describe the fish’s characteristics.
- Associate an image file with the fish and add it to the drop down fish selection box so a user can add it to the environment.
- Associate the new fish class with a fish display class so it can be shown on the environment display.
There are two kinds of fish that can be added to the J# Marine Biology Simulation. Drawn fish are the types of fish that are in the simulation as distributed. These fish are drawn on the environment using graphical functions. Image fish are optional fish that use prepared image files (GIF, JPG, and BMP) provided by the programmer. Step 3 above will be somewhat different depending on if the programmer is adding a drawn fish or an image fish. Steps 1 and 2 are the same regardless of the type of fish.
Create a Fish Class
Fish classes are created in the MBSCore project and must extend the Fish class.
- Select the MBSCore project in the Solution Explorer
- From the Project Menu, select the Add Class option
- Add the name of your fish as the class name in the dialog box and click the Open button.
- Create the code for your new fish.
The new fish class should include several constructors. One should include parameters for Environment and location, environment, location and direction, and environment, location, direction and color. The classes supplied with the case study provide examples of these constructors. Other methods will depend on the nature of your fish class. The standard documentation for the Marine Biology Simulation provides more information about these classes.
Adding the Class to the Drop down List
There are two arrays that determine the class names and associated icons for fish that are displayed as options for the simulation at run time. FishNameArray holds the names of all available fish classes. FishImageArray holds the list of images that are associated with each fish class in the drop down list. There are comments in GUIForm.jsl that indicate the changes that are needed for both of these arrays.
The values in FishNameArray are strings that match the class name of a fish class. This information is case sensitive.
The values in FishImageArray are either a named reference to an image in Custom.rsx or an image on the system. See Adding Images to Custom.rsx below for information about adding a graphic image to the resource file. An image not in Custom.rsx may be added to the array by specifying the full location to the file. If no path is specified, the running program will look for the file in the \MBSGUI\Bin\Debug folder. The first line below uses a gif file from the resource file
FishImageArray[2] = (Image)resMan.GetObject("darter.gif");
Image files that are not included in the Custom.rsx resource file are added using the FromFile static method of the Image class. The next line loads an image using a file from a specific location of the hard drive.
FishImageArray[2] = Image.FromFile("c:\\images\\darter.gif");
The program will display a runtime error if the file is not found. All images for the drop down menu should be 22 pixels wide and 20 pixels high or they will not display properly
Drawn Fish
The MBS comes with four classes that draw different fish on the environment. The following table describes these fish.
|
Fish Class |
Description |
Image |
|
FishDisplay |
Default fish |
|
|
LittleFishDisplay |
A smaller then average fish |
|
|
NarrowFishDisplay |
A thin fish of average length |
|
|
RoundFishDisplay |
A round fat fish of average length |
|
A programmer can associate any one of these drawn fish types to a class of fish using the associate method to connect the class name to the type of fish to draw. The following lines of code specify that a Fish object is drawn using the FishDisplay class; the SlowFish is drawn as a round fish; the DarterFish is drawn as a narrow fish; and the BadyFish is drawn as a little fish.
DisplayMap.associate("Fish", new FishDisplay());
DisplayMap.associate("SlowFish", new RoundFishDisplay());
DisplayMap.associate("DarterFish", new NarrowFishDisplay());
DisplayMap.associate("BabyFish", new LittleFishDisplay());
This code is entered in the GUIForm.jsl class file. This location is commented in the code. The class name in the first parameter must match the class name of a class in the solution.
Image Fish
The ImageFishDisplay class allows the programmer to use specific image files to display fish on the environment. The difference between an image fish and a drawn fish is how the fish is displayed. Any supported image may be displayed by the ImageFishDisplay class. The image will automatically be scaled to fit the squares in the environment. The image file must be added to the Custom.rsx file (see instructions below). The image is added to the DisplayMap class by creating a new FishImageDisplay as shown below.
DisplayMap.associate("SandDollar", new FishImageDisplay("sanddollar.gif",Direction.EAST));
Images will be tinted to match the color selected by the Color drop down menu.
Adding Images to Custom.rsx
The CustomResXGenerator project is used to rebuild the Custom.rsx resource file when an image needs to be added or has been changed. New or changed images are first added to the Resources directory. BMP, JPG and GIF files are supported image files. All image files in this directory will be added to Custom.rsx file by CustomResXGenerator.
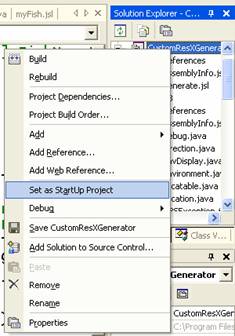
To use CustomResXGenerator first change the startup project for the solution. Do this by right clicking on the CustomResXGenerator project on the Solution Explorer to get the menu shown below. Select the Set as Startup Project option.
Compile and run the program. Once the program completes change the Startup Project back to MBSGUI to use the new resource file.
Note: If you browse the Resources directory with Thumbnails a file called Thumb.db may be created in the directory. This file is not compatible with CustomResXGenerator and must be deleted before rebuilding the Custom.rsx file.
Copyright Alfred C Thompson II 2006